Sunday, January 30, 2011

DIY Large Abstract Art

I don't think I've ever used someone else's blog as a spring board for Pretty Old Houses, so here's a first.

I loved this post about Abstract Art from Kate at  Centsational Girl. (she talks about making a piece of large scale art herself and the stuff that's available for sale that's her inspiration--click the link--this post is very good)

I’ve really been wanting some abstract art myself since we moved into our Pretty Old House and painted all the walls Benjamin Moore "Creamy." 

Here’s what my hubby made for me for Christmas out of plywood and other left over materials from the renovation.  I think he spent $ZERO in materials, he said he was too poor to buy me a present.  But he was hard at work in the basement on his “top secret project” for a couple of weeks.


He layered DRYWALL MUD to give the piece texture and then ROLLED ON –with a sponge roller from my touch up kit—Benjamin Moore latex flat wall paint in the colors we’d used in the house—plus a little black/gray latex paint.


The colors are Benjamin Moore--Herbivore(green), Rainwashed (blue) and Creamy (white).


When he brought it up from the basement I just about died.  IT'S WONDERFUL.

I love the contrast between the modern abstract and the old traditional in our dining room.


Sometimes I just stand in front of it and look.

Patti
http://www.pattihinkle.com/

Linking to: 
Remodelaholic

Friday, January 28, 2011

Living Room Before and After

The other day I decided to clean the house.  I know that's an outrageous thing to do, but the dust bunnies were taking over. During one of my numerous ADD attacks I became disgusted with the state of our living room. I'd never really put it back together after Christmas and it had become a junk pile.

BEFORE


The shelves were particularily junky and needed to be "done."
And what was up with those chairs.


Notice the dog chew toys.  Buster's the only one who even goes in this living room with it looking like this.

SO....
Until I can buy all new living room furniture.

I rolled up the rug--it's the wrong color--I'll think I'll try to sell it--it's a very nice hand tied oriental rug.
Moved the console with marble legs. AND the bookcases. Brought the sofa back in from the family room and here's what I came up with.

AFTER


I'm not totally finished with the shelves, but I'll keep working on them.


The black rocking chair doesn't go but I love it -- it might have to stay.
The art work is Holly's Christmas present that was recently finished, so it'll be moving on.
I do like the marble legged console so much better on this smaller wall.  The proportions are waay better in my opinion.
Window treatments would be a nice touch in here don't you think?

stay tuned,

Wednesday, January 19, 2011

A Pretty Old Bungalow in Atlanta's Grant Park

You know Pretty Old Bungalows are my favorite kind of Pretty Old House.


This one's in Grant Park in Atlanta. 

Grant Park is one of Atlanta's older neighborhoods dating from the 1890's.
You can visit the Grant Park Neighborhood Association online here.
History buffs might want to see the History section.

Recently, Holly, my daughter and Real Estate Partner, was fortunate enough to list this home on Atlanta Avenue for sale.  I'm always excited to market Pretty Old Houses and this one is very pretty.

I'm a sucker for a front porch...


...especially if it can handle a swing, or furniture.
Wouldn't you just love to hang a few ferns and maybe add another chair or two and some "porch decor."
Of course at this time of year, it's too cold for ferns and we'd need a parka to sit outside.
It's hard to see in this photo, but the ceiling is made of beaded board--it's original and classic!
Also, check out the front door.  That's as bungalow as it gets.


This house is just brimming with original details...like the craftsman style fireplace.


This one is flanked by two high casement windows--one with shelves below and the other with a nifty bench.
Notice how small the firebox is.  This was a coal burning fireplace--what a mess that must have been  back in 1920.
When it was new, the trim was probably stained a dark color--I'm sure that was practical with a coal burning fireplace--and it was very stylish. These homeowners limited the dark stain to the hardwood floors. 
Good choice.


Another nice original feature of this house is the pair of French doors that lead to the dining room... 


...and the Butler's Pantry.


From there you step into the 21st Century.
The kitchen has been totally redone with modern cabinets, granite counter tops, appliances--the whole she-bang..


..complete with an open breakfast/family room across the whole back of the house.
It's a modern floorplan within a classic bungalow--love it!


Throw in a true master bathroom--clawfoot tub included and...


 a De-Lux shower with framless glass surround.


It would be just about perfect with a low deck and flat backyard with alley access.
Well, here it is.
The new zozia sod is just icing on this cake.


I'll let you know when we've scheduled an Open House and you can stop by and visit.

Take care,
Patti

Monday, January 10, 2011

Let it Snow

Last night it snowed here in Atlanta.
I mean it really snowed.  For Atlanta it was monumental.


So we did what just about everybody in Atlanta does when it snows--we skipped work and went outside to play.
In our case we went for a nice looong walk--all the way over to Piedmont Park to see the kids sledding.


It was beautiful.
We were encouraged to see that not everything has changed in the Southern Sledding Arena.  While lots of plastic discs were in use and a few Northern Transplants had real sleds
there were still plenty of hardy souls making do--the lids to Rubbermaid storage boxes were popular and the perennial stand-by
Cardboard--was common.

Here's a sight we don't see often:  Morningside Village in the snow.

Almost everything is closed today.
A couple of cars ventured out and drove through Alon's parking lot while we were walking by, but alas Alon's was dark and deserted.


Now for the "Gladys Kravitz Report"

The workers went at it all weekend to get the roof on before the snow. 
 I rarely see so much activity on Sunday, but these guys really hustled.
And they did it.


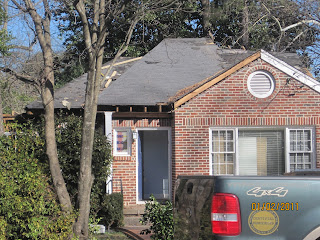
I think this one is going to look alright when it's finished--baring some truly terrible paint colors or design choices.
I am curious to see how they finish the roof above the room on the far left.
Popping this top is definately an improvement that probably doubled the living space in the house.


Have fun if you have snow to play in, or enjoy a nice long walk.
I think I might curl up with some homemade hot chocolate and catch up on the latest from blog-land.

Patti

Wednesday, January 5, 2011

Another One Pops the Top

Here "in-town" popping the top is really in vogue.
It's different from popping a top in the 'burbs.

The good ones look the same-- or nearly the same-- from the front.
This house was recently renovated by Jim Hogan. It's for sale and is staged beautifully.
(If you want to see it, let me know and we'll take a peek.)

Sometimes changes are made to the front and they come off ok and even great.


This is another very recent "bump up."
I love it!

If you look very very carefully you can see that the brick on the new addition isn't exactly the same as the old brick.  The owner said this was as close as they could get. There's one color missing in the new brick.
I still love it.


One of the things I love about this house is the way they matched the little tudor curl on the roof. (I'm sure that has a name, but I don't know what it is.) The new gable mimics the original.  Note: the white trim piece on the new gable is made of a plastic material that bends. Ingenious!


The eyebrow on the back of the house truly does it for me.
I'm dying to have a tour.


Two doors up from this beauty is this...


Right now, the best thing I can say is it could possibly be "Miss Congeniality".
I'm sure it's homey and cozy.
But they're Popping It's Top.


Yesterday I channelled Gladys Kravitz.


And took these shots of the progress...

out my upstairs window.
(Just think if Gladys had had a digital camera with a zoom lens.)

They eventually took the whole roof off and added heavier floor joists to support the second floor addition.
There's more progress today.


Stay tuned if you have an "Enquiring Mind" and see how this one comes out.
Strange things happen when they "Pop the Top".

Patti

Monday, January 3, 2011

How to Really "Trim" the Tree

I realize it's the NEW YEAR, but I'm not done with Christmas.

Last blog I mentioned I'd talk a little more about trimming the tree--so here I go.


A few years decades millennia ago I read an article by a hoity toity designer about trimming a Christmas tree.

That idea rolled around in the back of my mind until this year when I remembered to try it.

Conventional wisdom says a "Good" tree is tall and full and dense and shaped like a perfect triangle.
We always search the lot until we come away with the fullest, roundest, densest tree we can find.
...and then I struggle in leather gloves to stuff lights up inside it to give it that wonderful glow.  I finish by arranging the ornaments on the outer layer.  The bells don't jingle, Mickey Mouse's arms and legs don't dangle and there's no place to hang the 6oz Santa face.

In 2004 we had a super thick one. You can see  the Santa Face here with all the wires running around on the outside of the tree. 


Not good. Why?  Because we had to have that big-fat-thick-heavy tree.

Well no more!
Mr. Hoity Toity Designer had it right.
By trimming he meant cutting it with garden clippers.
He culled out the branches he didn't want and shaped the tree so it would show off the ornaments.

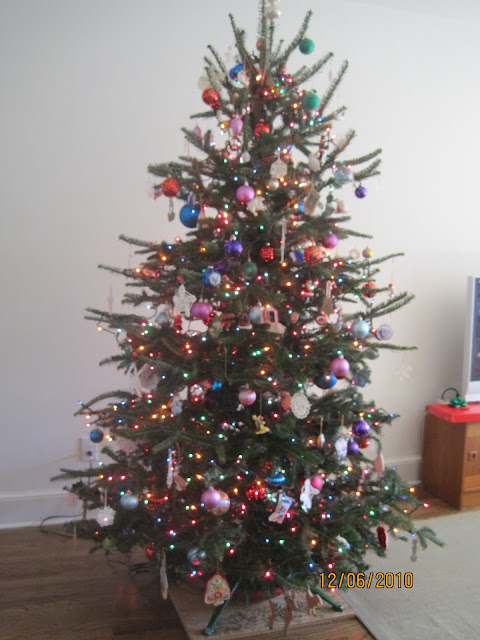
Here's my Much Improved 2010 Tree.


It's a little lop-sided but I think it was one of the prettiest trees we've ever had.--Maybe you needed to have seen it in real life.

We started by picking a not so dense tree.
Then I went to work with the garden clippers.


 I started in the middle because there was a ghost of a layer already in place and I didn't know what I was doing.  I clipped, working my way around the tree and then moving on to the next "layer". 

I admit it's scary to hack out almost a third of the Christmas tree, but what the heck. If it had been a disaster, we'd have decorated it anyway and acted like we didn't know any better.


So Faithful Blog Followers, put this idea in the back of your mind and bring it out in a few years. I hope you'll be as happy with your "trimmed" tree as I was.

Patti
www.PattiHinkle.com